
Kafka
To consume real data, you can connect Arroyo to a Kafka cluster and create sources from topics. This tutorial will cover setting up a local Kafka broker and generating some sample data.
Setting up Kafka
Section titled “Setting up Kafka”The easiest way to get a Kafka broker up and running is to use the Confluent Platform. Follow the installation instructions here to set up a local installation on your machine.
Once you have the Confluent Platform installed, you can start the Kafka broker by running the following command in the confluent directory:
$ bin/confluent local services startGenerating data
Section titled “Generating data”The Confluent Platform includes Kafka connect, which can be used to generate data for testing using the datagen plugin. First, we need to install the plugin. Run the following command in the confluent directory:
$ bin/confluent-hub install --no-prompt confluentinc/kafka-connect-datagen:latest$ bin/confluent local services connect stop$ bin/confluent local services connect startTo create a topic, go to the control center UI at http://localhost:9021/clusters. Click into the cluster, then the Topics page.
Click “Add Topic” and create a topic called orders with default settings. Then create a second topic with the
name results.
Next we’re going to create a Kafka connect source to generate data. Click the “Connect” tab in the control center and select the “connect-default” cluster.
Write this JSON to a file called /tmp/datagen.json:
{ "name": "datagen-orders", "connector.class": "io.confluent.kafka.connect.datagen.DatagenConnector", "key.converter": "org.apache.kafka.connect.storage.StringConverter", "value.converter": "io.confluent.connect.json.JsonSchemaConverter", "value.converter.schema.registry.url": "http://localhost:8081", "quickstart": "pizza_orders", "kafka.topic": "orders", "tasks.max": 1}Then click “Add Connector” and select “Upload connector config file,” and find the /tmp/datagen.json file you created. This will preload the connector with the correct settings. Click “Next” and then “Launch” to create the connector.
Now clicking back into the orders topic on the Topics page, you should see data being generated.
Creating a Kafka connection
Section titled “Creating a Kafka connection”Now that we have a Kafka broker running and some data being generated, we can connect it to Arroyo by creating what’s called a “Connection,” which is an external system that Arroyo can read from (as a source) or write to (as a sink).
There are two ways to do this: we can either create a connection in the Web UI, or directly in SQL using DDL statements. We’ll start by creating the source connection in the Web UI by opening it at http://localhost:5115.
A Connection in Arroyo is an external system that Arroyo will read or write to. To create a Kafka connection, click the “Connections” tab in the Arroyo UI and then click “Create Connection.”
Find Kafka in the list of connectors, and click “Create.”
Next we will need to configure the connection information for the Kafka cluster. This is stored separately from the table configuration so that it can be shared across many different connections.
At the bottom left, click “Create new”. How you configure the connection will depend on how you’re running Arroyo.
For each method, you will use the following settings:
-
Name:
local-confluent -
Boostrap Servers:
If you’re running Arroyo locally, configure your kafka connection with:
Bootstrap Servers: localhost:9092Due to how Kafka networking works, it is not straightforward to connect to a Kafka node running on your local computer from a Docker container. More information on how to set this up can be found in this StackOverflow question
If you’re running Arroyo in Docker on Linux, you will need to do a bit more setup to enable Arroyo to talk to Kafka.
First, you will need find your bridge IP address. You can do this byw running
docker network inspect bridge | grep Gatewaywhich should return an ip address, for example
172.17.0.1.Then you will need to configure the Kafka broker to listen on that IP address. To do this, edit the
etc/kafka/server.propertiesfile in the confluent installation and add the following lines:listeners=PLAINTEXT://localhost:9092:DOCKER://172.17.0.1:19092,listener.security.protocol.map=PLAINTEXT:PLAINTEXT,DOCKER:PLAINTEXTFinally, you will need to restart the Kafka broker by running
$ bin/confluent local services stop$ bin/confluent local services startThen, use the gateway IP address with port 19092 as the bootstrap server in the connection settings, for example
172.17.0.1:19092. -
Authentication:
None -
Schema Registry:
Confluent Schema Registry -
Endpoint:
http://localhost:8081,http://host.docker.internal:8081, orhttp://<GATEWAY IP>:8081similarly to how you configured the bootstrap servers above)
Click “Validate”, and “Create”.
Configuring source table
Section titled “Configuring source table”Once the cluster config is created, we will need to configure the source table. Select your newly created connection profile, then click “Continue”.
At the “Configure table” stage, enter:
- Topic:
orders
This will configure the table as a source, reading from the orders topic, and
starting from the latest offset.
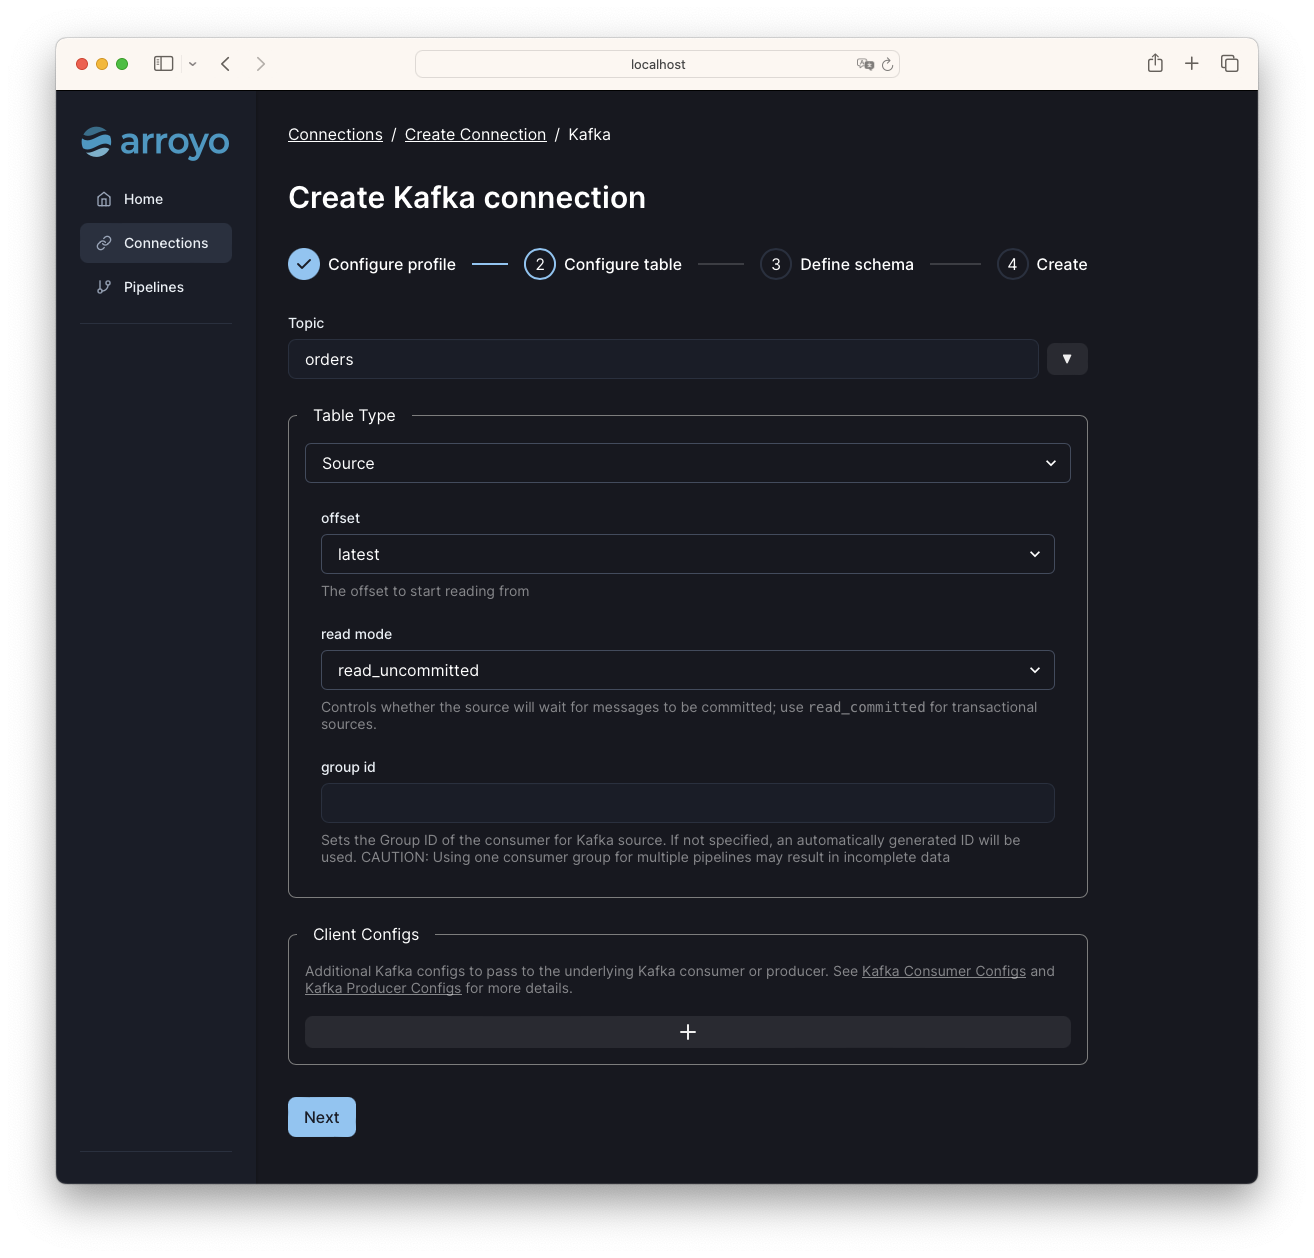
The other options can be left as default. Click “Next” to continue.
Arroyo sources need to have a defined format and schema so that data can be deserialized and used in SQL queries. The Kafka data generator is configured to produce data in JSON format, so we’ll select that as the data format.
We also configured the generator to use the Confluent Schema Registry, so we can use that to configure the schema automatically.
Set the following options in the “Define schema” section:
- Data format:
JSON - Schema type:
Confluent Schema Registry
Currently, json-schema is the only supported format. Also supported is the Confluent Schema Registry, which can be used to store and manage schemas. Since the topic we generated has an associated schema in the schema registry, we’ll use that.
Click “Continue” to finish configuring the source table. On the final screen, we
can give the connection a name orders, then test that it’s valid.
When you click “Test Connection,” Arroyo will attempt to connect to Kafka with the configured bootstrap servers, validates that the topic exists, and tries reading a message from the topic.
If everything is good, click “Create” to create the connection.
Creating the Pipeline
Section titled “Creating the Pipeline”Now we’re ready to talk to Kafka! Go to the Pipelines tab, and click “Create Pipeline.”
This brings us to the pipeline SQL editor. On the left, we can see all of the
sources and sinks we’ve created, including the orders source. By clicking on
the source, we can see the schema of the source table.
We can start with a simple query that will select all the orders from the orders table to see what the data looks like:
SELECT * from orders;Previewing that should show a stream of data being generated by the datagen connector.
Let’s try something a little more interesting. We’re going to count the number of orders by store over a sliding window. We can do that with this query:
SELECT count(*) as count, store_id as storeFROM ordersGROUP BY store_id, hop(interval '2 seconds', interval '10 seconds');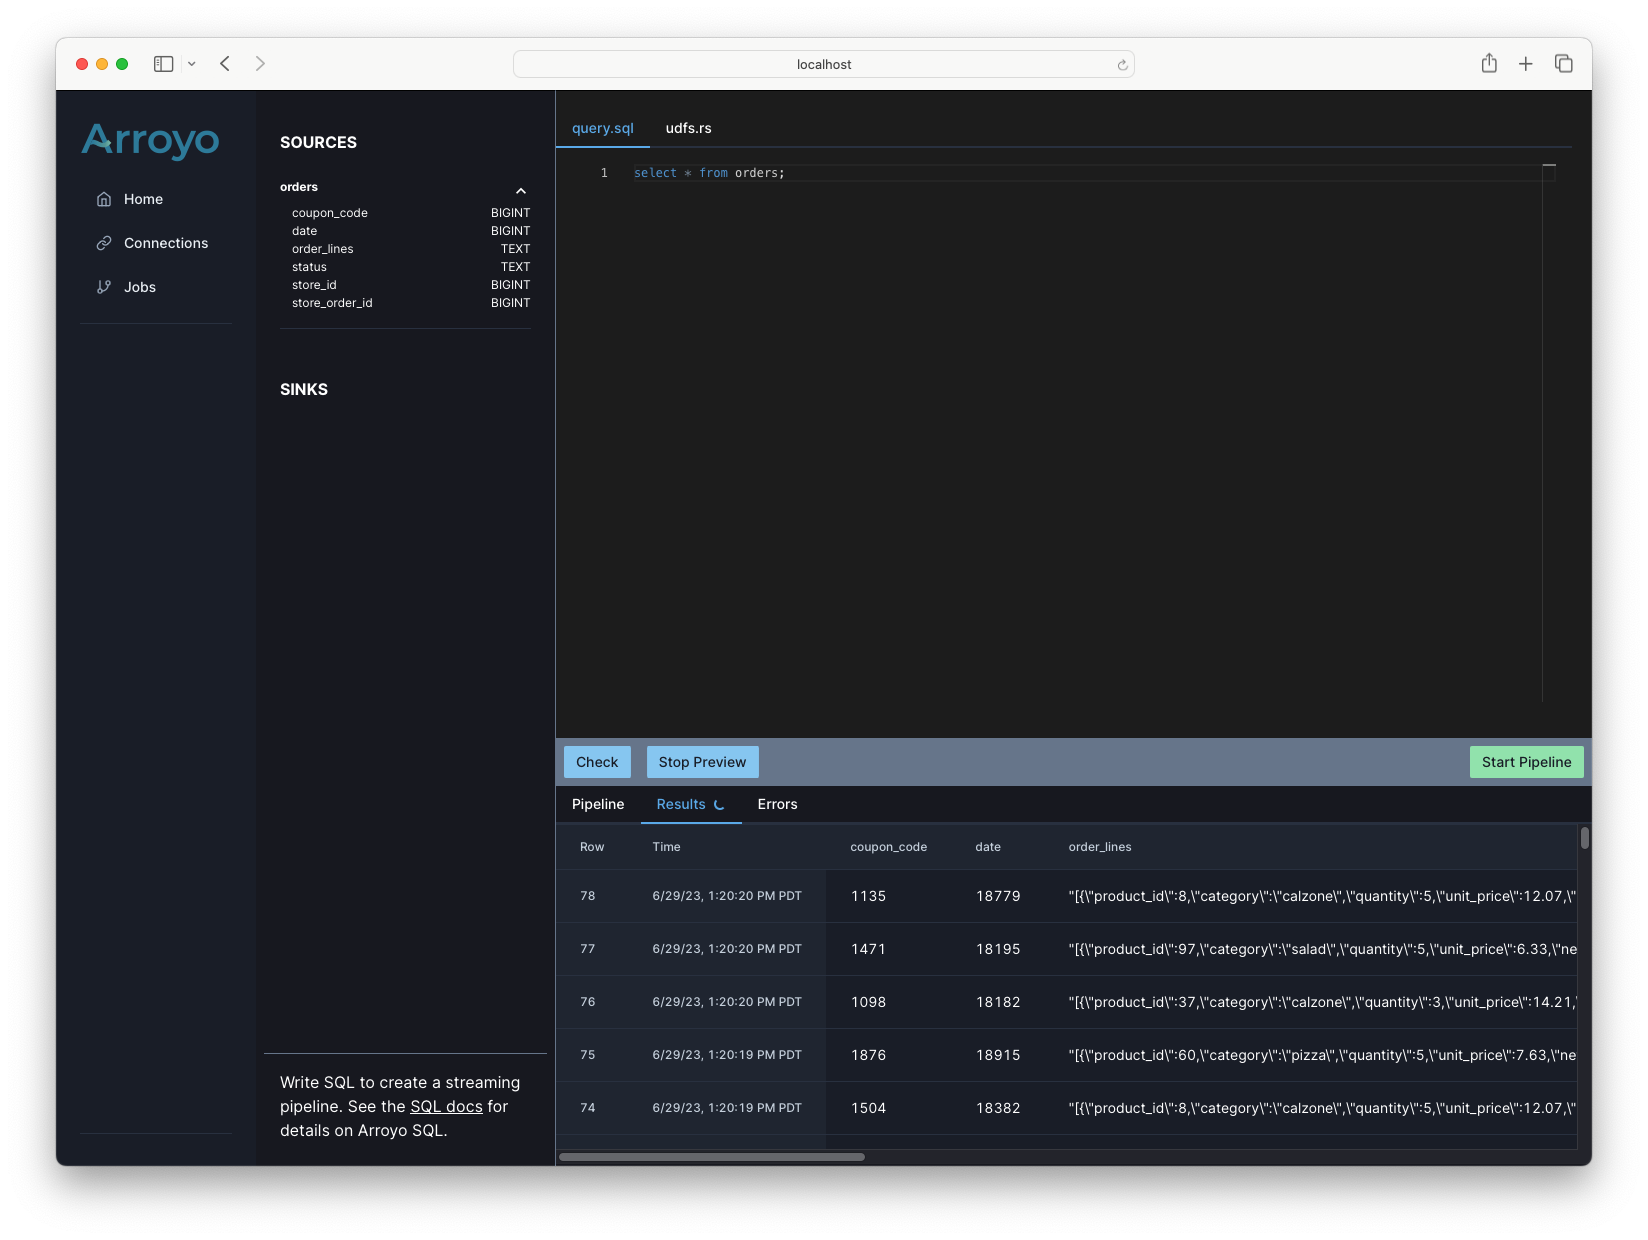
Inserting into a Kafka sink
Section titled “Inserting into a Kafka sink”There are two ways to create connections in Arroyo. Previously we created a Kafka source connection via the Web UI, and now we’re going to create a Kafka sink via SQL.
Connections (sources and sinks) are modeled in SQL as tables, so we can create them via DDL statements. It will look like this:
CREATE TABLE kafka_sink ( count BIGINT, store BIGINT) WITH ( 'connector' = 'kafka', 'type' = 'sink', 'format' = 'json', -- use the same value for bootstrap_servers as you used above 'bootstrap_servers' = 'localhost:9092', 'topic' = 'results');Connection tables are created via CREATE TABLE statements that have a
connector with option, which specifies which connector should be used; in
this case Kafka. Other required options are type which specifies whether the
table is a source or a sink, and format which specifies the format of the
data.
Then, each connector will have a set of options that may be set—for Kafka, we
need to set the bootstrap_servers option to tell it how to connect, and the
topic to write to. See all of the options for the kafka connector in the
connectors docs.
Now we’re ready to send the results of our query to the kafka sink we created,
which we do via an INSERT INTO statement.
This gives us the entire query:
CREATE TABLE kafka_sink (    count BIGINT,    store BIGINT) WITH (    'connector' = 'kafka',    'bootstrap_servers' = 'localhost:9092',    'type' = 'sink',    'topic' = 'results',    'format' = 'json');
INSERT INTO kafka_sink SELECT count(*), store_idFROM ordersGROUP BY store_id, hop(interval '2 seconds', interval '10 seconds');Now we’re ready to run the pipeline for real. Click “Start Pipeline” and give the pipeline a name, and click “Start.”
Once the pipeline starts running, we can see the outputs by running the Kafka console consumer in the confluent directory:
$ bin/kafka-console-consumer --bootstrap-server localhost:9092 --topic results{"count":2,"store":3}{"count":1,"store":6}{"count":5,"store":8}{"count":4,"store":4}{"count":4,"store":5}{"count":5,"store":1}...When you’re done, hit “Stop” to stop the pipeline. You may also want to stop the datagen connector, which you can do in the Confluent Web UI.