
Confluent
Arroyo provides sources and sinks to read and write from Confluent Cloud-hosted Kafka topics, with support for exactly-once semantics.
To connect to Confluent Cloud, you may create a connection either in the Web UI or directly via. SQL.
Create a Connection via UI
Section titled “Create a Connection via UI”To create a connection via the Web UI, open the Arroyo UI and click “Connections” in the left sidebar, then “Create Connection.” On the connectors page, click “Create” under the Confluent Cloud connector.
On the next screen, you will configure the Connection Profile, which tells Arroyo how to connect and authenticate to your Confluent Cloud account. Either select an existing profile, or click “Create new” to create a new profile.
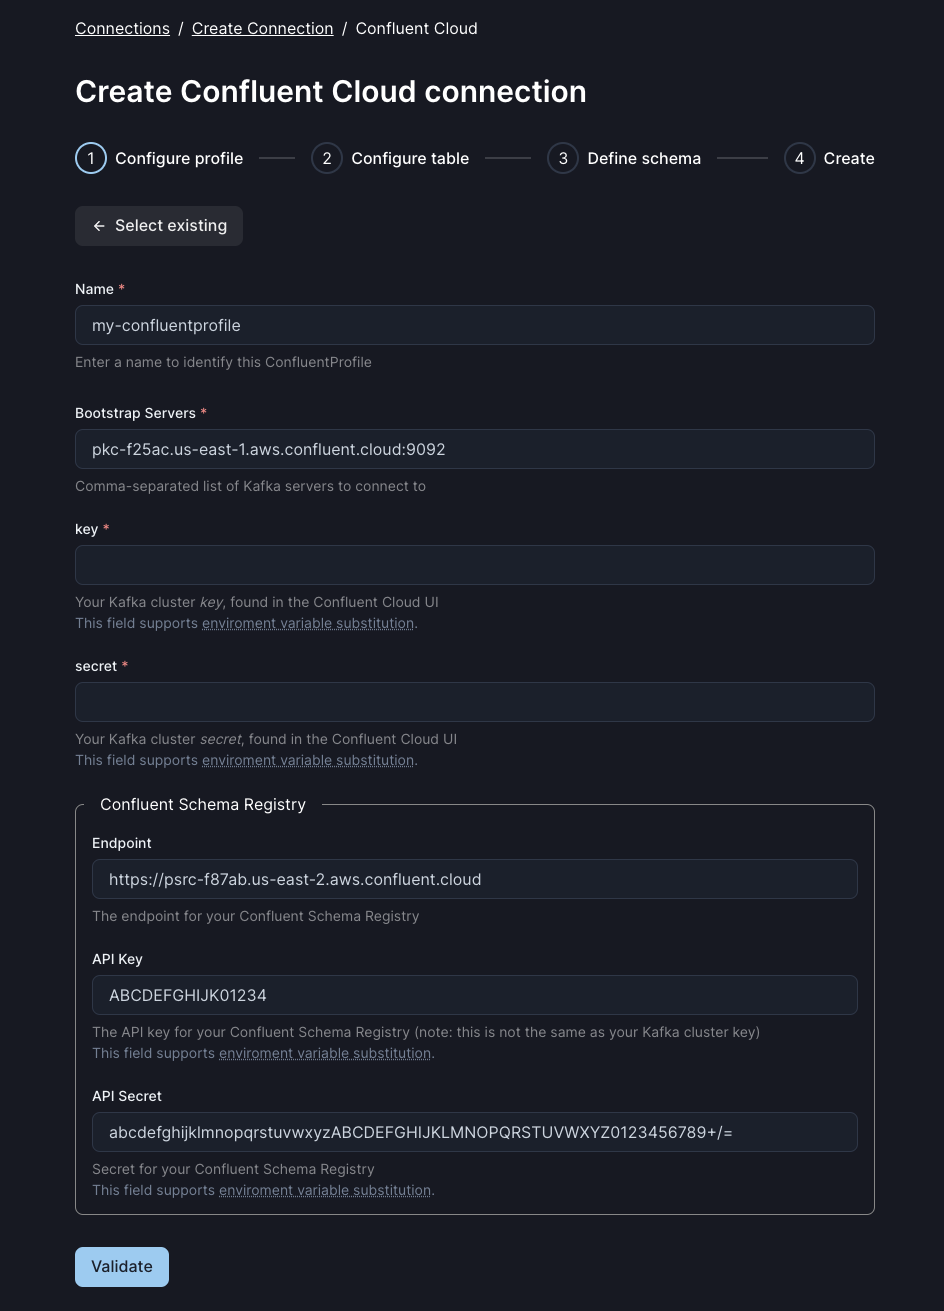
Start by giving the connection profile a name, which will help you identify this connection. You may wish for this to be the same as the cluster name in Confluent Cloud.
For the rest of the fields, we’ll need some information from your Confluent Cloud account.
Connect to Confluent Cloud
Section titled “Connect to Confluent Cloud”In another tab, open the Confluent Cloud console, and navigate to the Cluster Settings page for the cluster you wish to connect:
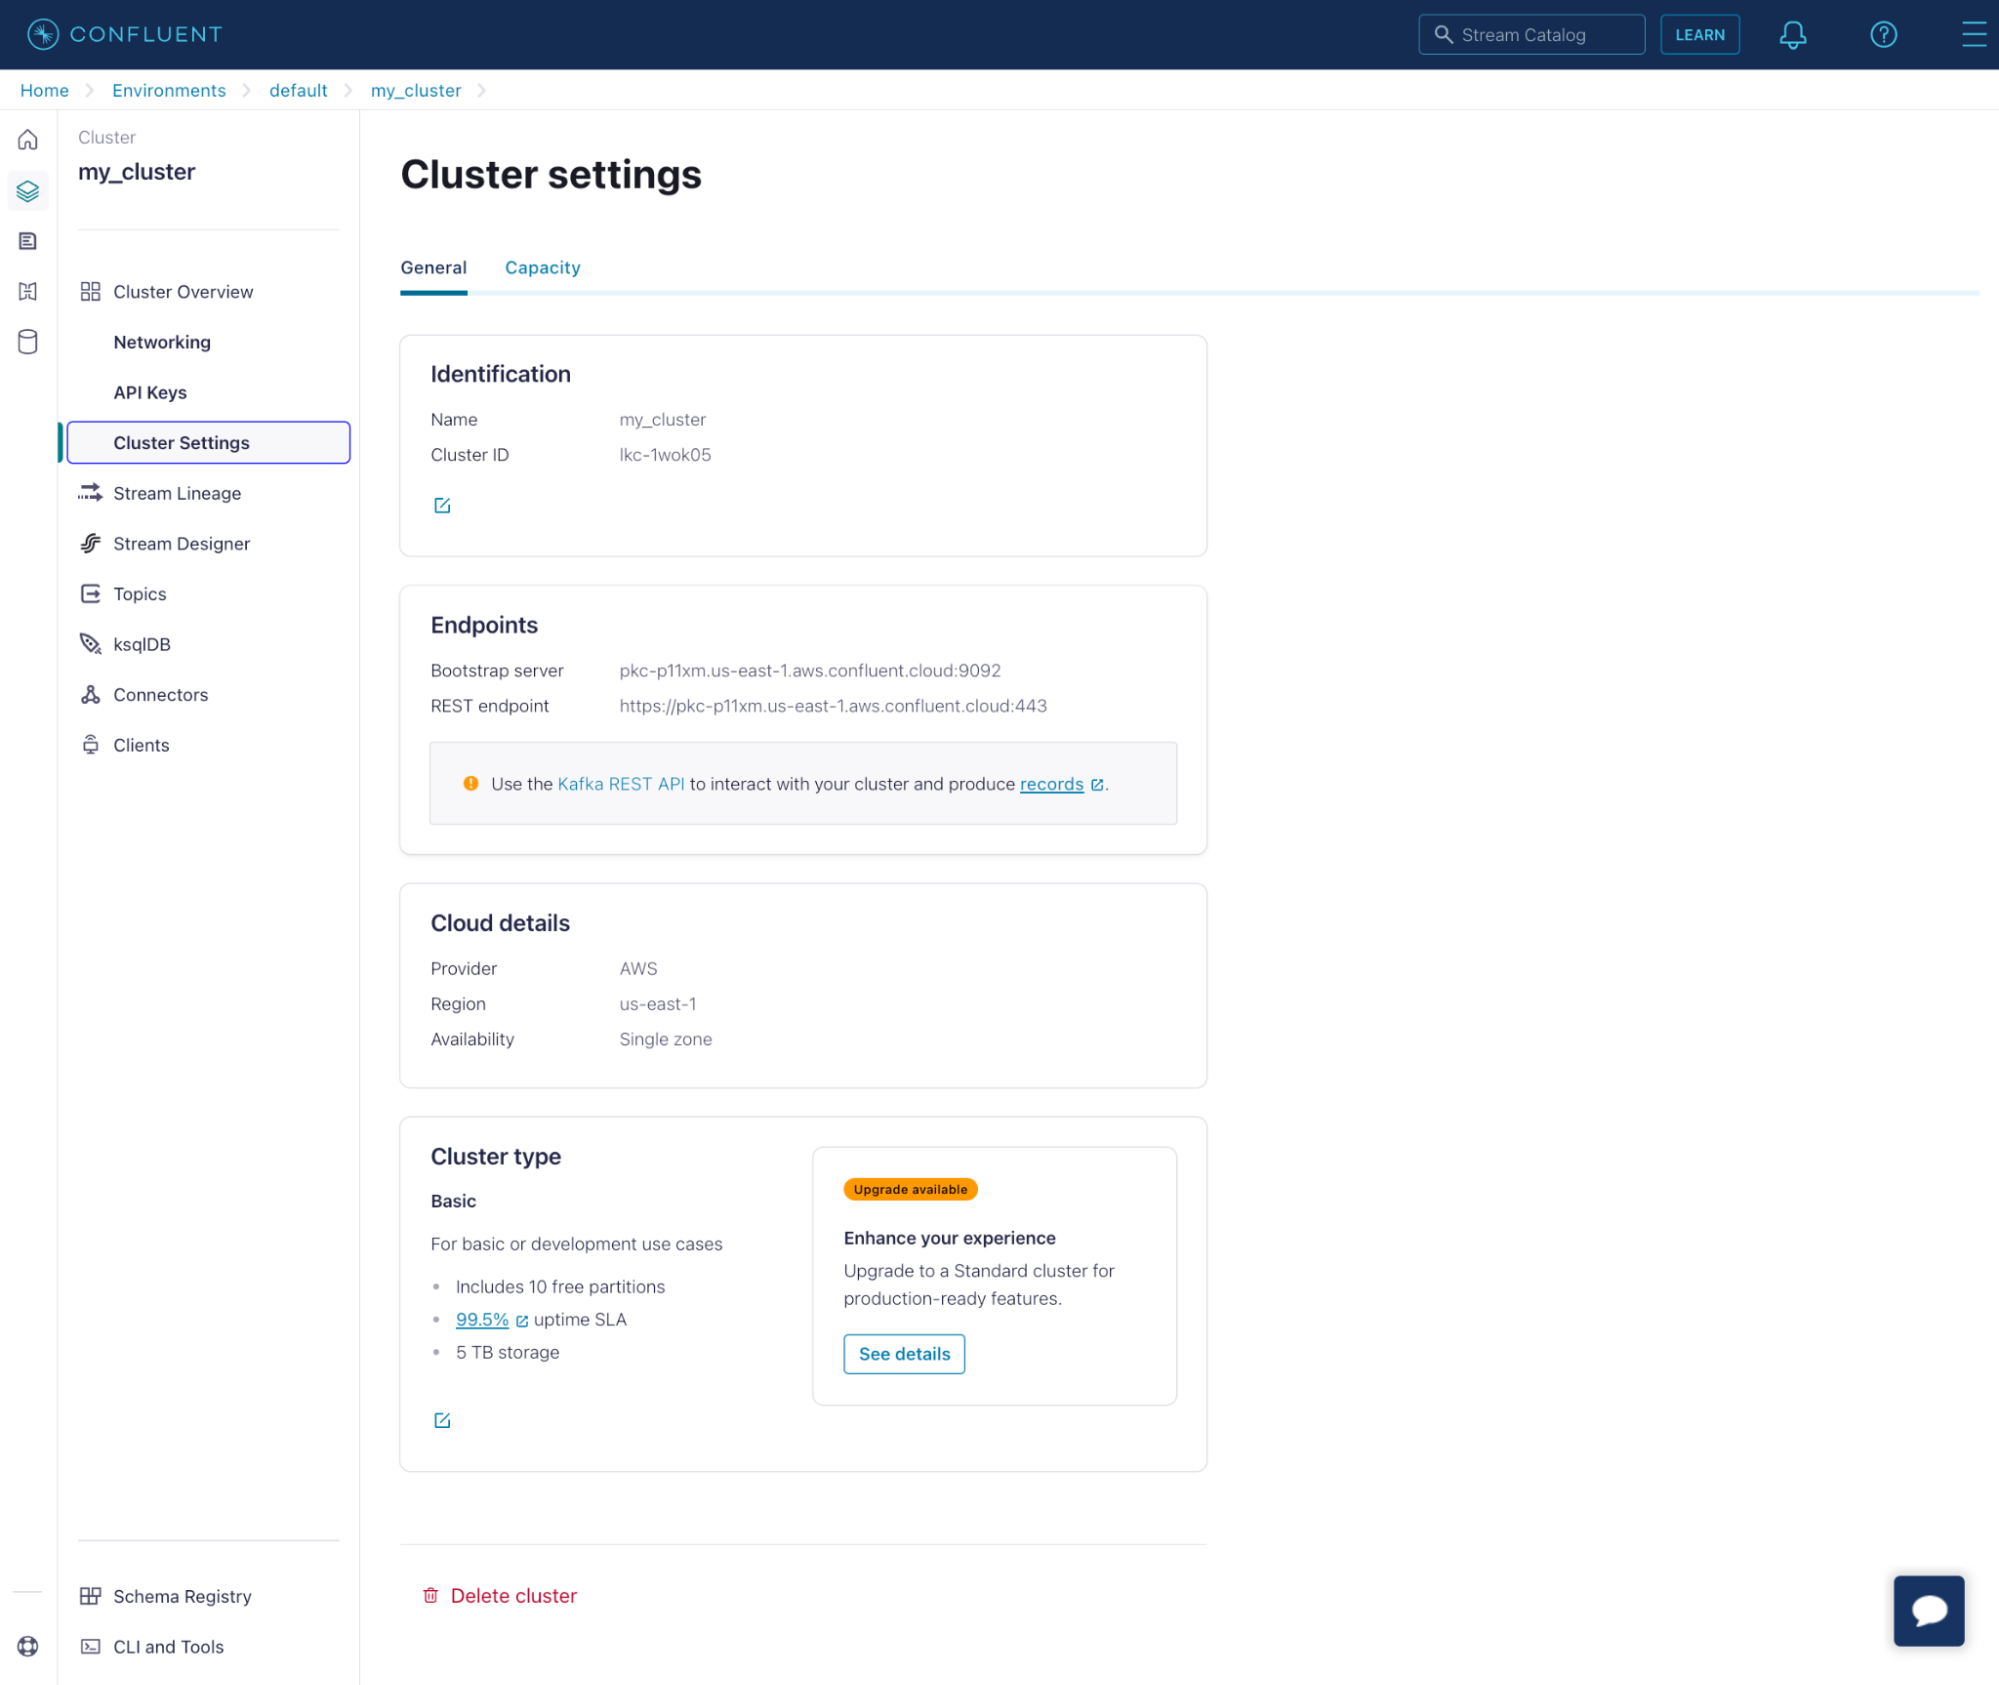
Find the Bootstrap server (like pkc-p11xm.us-east-1.aws.confluent.cloud:9092)
and enter that in the “Bootstrap Servers” field.
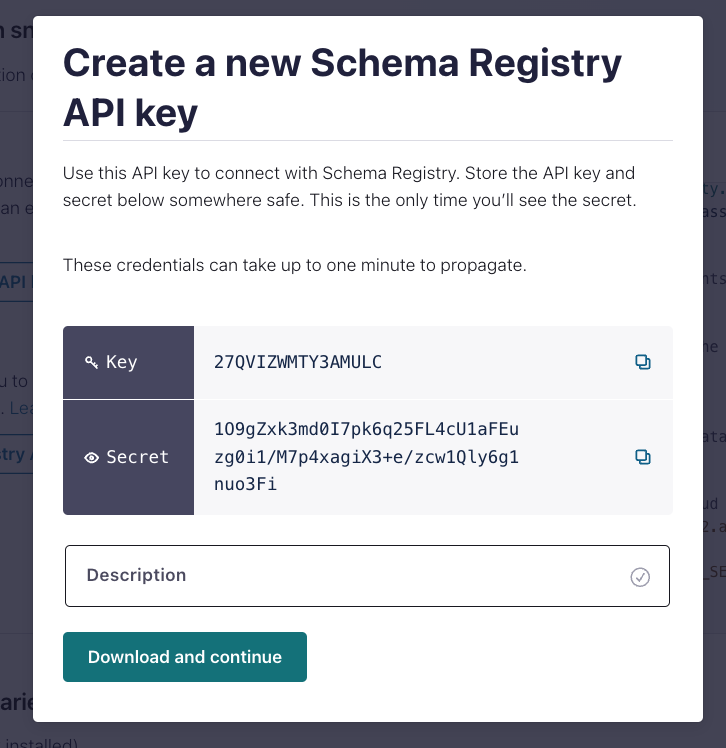
Next we need credentials for Arroyo to connect to your Kafka and Confluent
Schema Registry. Click API Keys in the Confluent Cloud sidebar. Click “Add
key” and create a new set of credentials. On the last page, you will see the Key
and Secret. Enter these into the Arroyo connection dialog as the key and
secret fields.
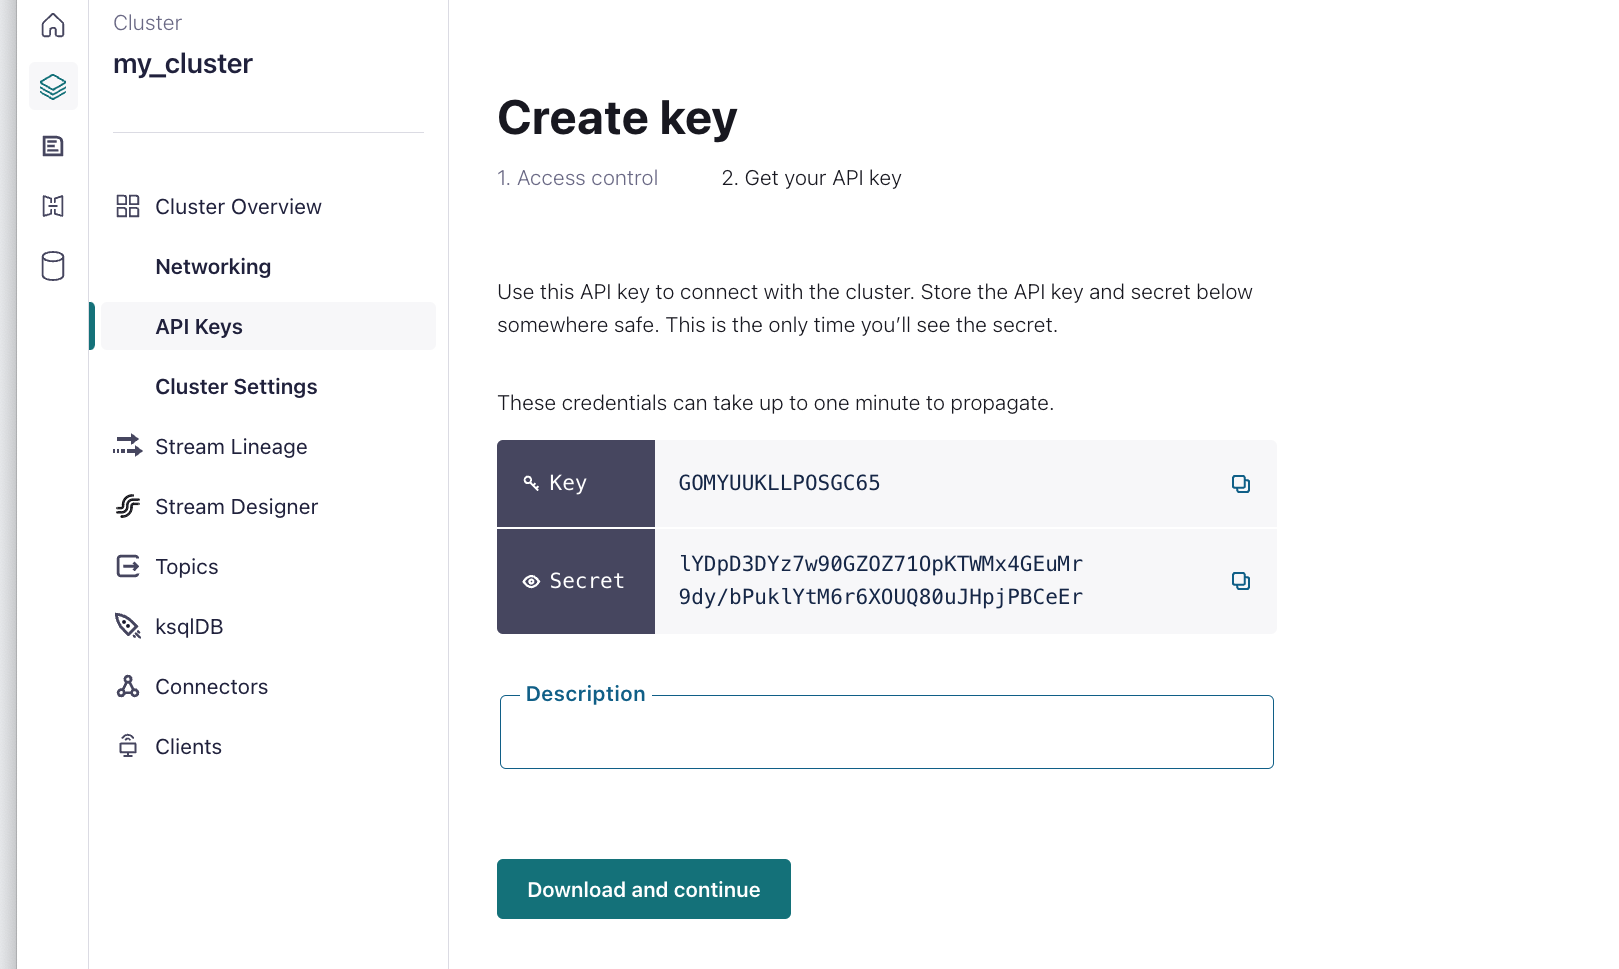
Give the new credentials a name, and click “Download and continue.”
Confluent Schema Registry
Section titled “Confluent Schema Registry”Optionally, you may also configure the connection to the Confluent Schema Registry if you wish to use it to fetch and produce schemas for your data.
In the Confluent Cloud UI, click Environments in the left sidebar, then select the environment with your cluster.
On the right side bar, you will see a panel called “Stream Governance API.” with an Endpoint URL.
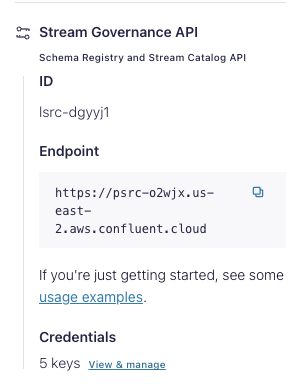
Enter that into the Arroyo Connection as the Endpoint, under “Confluent Schema Registry.”
Next, click the “Add Key” or “View & Manage” link under “Credentials” in the Stream Governance API panel.
That will take you to the credentials page, where you can create a new set of credentials.
Enter the Key and Secret as the API Key and API Secret for Confluent Schema Registry, then click “Download and continue.”
Finally, in the Arroyo UI, click “Validate” to test the connection. If everything is set up correctly, you should see a success message and can click “Create” to save the connection.
Creating the table
Section titled “Creating the table”Once you’ve told Arroyo how to connect to your Confluent Cloud account, you can create source and sink tables that use that configuration.
Next enter the topic you would like to use, and choose whether this will be a source or a sink.
As a source, you may choose the initial offset to read from (either earliest or latest), and whether this should be a transactional (exactly-once) source or not.
As a sink you may choose the commit mode, which determines whether the sink is transactional. Choosing exactly-once means that messages will be written exactly once to the sink, but you may experience higher latency waiting for the transaction to commit durably.
On the next screen, select the format and schema for your data. See the format docs for more details on the supported formats. If you are using Confluent Schema Registry, select that in the “schema type” drop-down.
Finally, give the table a name (which you will use to reference it in SQL) and click “Test Connection.” This will verify that your connection is properly set up and we are able to connect to your Confluent cluster successfully. Once everything has been validated, click “Create.”
Configuration
Section titled “Configuration”A Confluent Cloud table can have the following configuration:
| Field | Description | Required | Example |
|---|---|---|---|
| connection_profile | The name of the connection profile to use for this table | Yes | my_connection |
| topic | The name of the Kafka topic to read from or write to | Yes | orders_topic |
| type | The type of table (either ‘source’ or ‘sink’) | Yes | source |
| source.offset | The offset to start reading from (either ‘earliest’ or ‘latest’) | No | earliest |
| source.read_mode | The read mode to use. ‘read_committed’ only reads committed Kafka messages, while ‘read_uncommitted’ will read all messages. | No | read_committed |
| source.group_id | For sources, sets the Kafka consumer group to use; note that using the same group for multiple pipelines will result in each pipeline seeing only a subset of the data | No | my-group |
| sink.commit_mode | The commit mode to use (either ‘exactly_once’ or ‘at_least_once’) | No | exactly_once |
Confluent Sources
Section titled “Confluent Sources”Confluent sources can be created via the Web UI, the API, or directly in SQL. A Confluent source is defined by a topic name and a schema.
Schemas can be defined via json-schema, or automatically configured via Confluent Schema Registry.
Confluent sources implement exactly-once semantics by storing the last-read
offset in Arroyo’s state. Additionally, you can set source.read_mode to
read_committed to ensure that only committed messages are read.
Confluent Sinks
Section titled “Confluent Sinks”Confluent Kafka sinks can be created via the Web UI, the API, or directly in SQL. A Confluent Kafka sink is defined by a topic name.
The sink supports both exactly once and at least once modes. At least once delivery will proactively write to the downstream Kafka topic as messages come in. This can potentially result in duplicate messages in the event of a pipeline failure.
Exactly once delivery writes to Kafka use its transaction API. Data is staged within each epoch of the checkpointing system, and then committed through a two-phase protocol once all data is staged.
Confluent DDL
Section titled “Confluent DDL”Kafka connection tables can be defined via SQL DDL and used as sources and sinks in SQL queries.
For example:
CREATE TABLE orders ( customer_id INT, order_id INT) WITH ( connector = 'confluent', connection_profile = 'my_cluster', format = 'avro', topic = 'order_topic', type = 'source', 'source.offset' = 'latest', 'source.read_mode' = 'read_committed');Schema Registry integration
Section titled “Schema Registry integration”Arroyo supports the Confluent Schema Registry for both JSON and Avro schemas. To use the Schema Registry for a table, you must have configured the connection profile with the schema registry endpoint and credentials. Then, it will be available as an option when setting the schema for the table.
How Arroyo handles schemas depends on whether the table is a source or a sink and the format.
Source tables
Section titled “Source tables”For source tables, Arroyo will read the schema from the schema registry at the time the table is created. This JSON or Avro schema is converted into a SQL table schema, as if it had been defined directly in SQL.
Because SQL has a less flexible type system than JSON schema, not all JSON schema features are supported
directly. For any fields that cannot be converted to a SQL type, Arroyo will create a column of type JSON
and store the raw JSON value in that column. The JSON value can then be processed via SQL JSON functions.
The schema is read from the schema registry at the time the table is created, which for tables created via the UI is when the table is saved; for tables created via SQL it is when the pipeline is started. The schema is cached for the lifetime of the table, so if the schema in the schema registry is updated or deleted, reads from the table will continue to use the original schema.
For Avro, there are some features that cannot be converted to SQL types:
- Unions (aside from unions that are a single type and
null, which are converted tonullablecolumns) - Maps
- Arrays
Fields with these types will be re-encoded as JSON and stored in a JSON column, in which form they
can be processed via SQL JSON functions.
At table creation time (when the table is saved in the UI or when the pipeline is started via SQL for SQL-defined tables), Arroyo will read the schema from the schema registry and convert it to a SQL schema. That schema is used as the “reader” schema for the lifetime of the table and determines what fields are available. If the schema in the schema registry is updated or deleted, reads from the table will continue to use the original schema.
When using the schema registry, Arroyo will also look at the schema ID for each message, and if it encounters a new schema ID, it will fetch the schema from the schema registry and use it as the “writer” schema. Messages are then decoded using the writer schema and then evolved to conform to the reader schema. This ensures that we are able to read the data, so long as the schema in the schema registry is compatible with the reader schema. Arroyo supports all types of schema evolution, with the caveat that fields marked required—NOT NULL in SQL—cannot be removed.
Sink tables
Section titled “Sink tables”For sink tables, Arroyo will write the schema to the schema registry at the time the pipeline is created. This schema is determined by the SQL schema of the table, and is converted to JSON or Avro as appropriate.
If there’s an existing schema in the schema registry, the new schema must be compatible for it to be written.